C-Astral Bramor ppX UAS Mission Planning
C-Astral Overview:
The Bramor ppX, made by the company C-Astral, is an extremely capable nearly fully autonomous fixed wing unmanned aerial vehicle (UAV) (see figure 1). It is a catapult launch and parachute recovery system that is capable of carrying a MicaSense ALTUM multispectral camera or a 42.4 megapixel RGB full frame camera for up to 3 hours.
 |
| Figure 1: C-Astral Bramor ppX UAV Source: http://www.droneprovide.com/civil.html |
Components:
The Bramor ppX UAV is a system with many different components that work together to create a functioning unmanned aerial system. The main components are listed below:
- C-Astral Bramor ppX UAV
- Ground Control Station (GCS)
- Getac F110 Ground Control Tablet
- Catapult Launcher
Each of these main components contain important sub-components shown in Figures 2 through 5.
 |
| Figure 2: C-Astral Bramor ppX UAV Components |
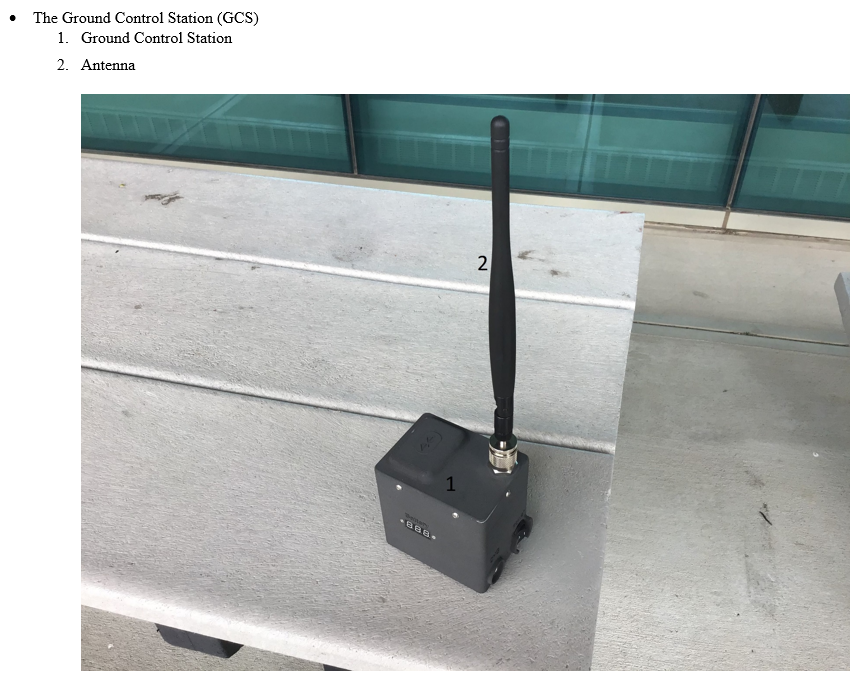 |
| Figure 3: Ground Control Station Components |
 |
| Figure 4: Gatec F110 Ground Control Tablet |
 |
| Figure 5: Catapult Launcher Components |
Mission Planning:
The Bramor ppX uses its own software called C3P, which allows the operator to plan, simulate, and execute missions. When planning a mission, there are many aspects to consider. These are discussed in my April 2nd post on the Yuneec H520 Incident in the checklist section, however specifics are discussed below.
The first aspect to consider is regulatory. Can one safely and legally operate in that area? Is the area restricted or prohibited, is it near or in controlled airspace, will the flight be conducted near or over people, etc? (see 14 CFR Part 107 for more information).
The second aspect to consider is the location. Use various satellite maps, topography maps, and 3D maps of the area to scout the location. How is one going to access the launch and recovery area, where are visual observers going to be located, what is the launch altitude and, is the catapult able to be angled in any direction to launch the Bramor ppX into the wind? Is the rally point set so that when the Bramor ppX descends it does not run into obstacles, is there an adequate clear landing area for the parachute recovery and, are there any obstacles/hazards or mountains near or in the path of flight?
The third aspect to consider is weather. What is the forecast throughout the day? What is predicted visibility, wind direction and velocity, precipitation, dewpoint, temperature, kp index and, sun angle during the proposed flight?
To plan, open the C³P mission planning application and click on the settings gear icon
 |
| Figure 6: Mission Pt (Point) Types |
Once the mission type is created, draw the mission then click the mission settings icon. Adjust the Altitude to the desired value keeping in mind the hazards, terrain, regulations etc. Set the Speed to 16m/s as this is a good speed for most sensors. Adjust the Overlap and Sidelap as necessary for the sensor and processing software. Adjust the Overshoot to 100 meters or more. (The Overshoot value is the distance that the Bramor ppX will fly past the mission area to turn around. Note that in high winds, this distance will have to be increased to allow it to get back on course before entering the sensor capture area.) Adjust the Selected Camera to the sensor used on the mission and finally, adjust the Altitude Mode to either relative, which follows a loaded in DEM, or Absolute which flies the absolute altitude above sea level. (Note that if flown in relative mode, and the terrain flown changes rapidly enough, the DEM resolution may not account for the difference quickly enough to avoid the terrain.) Figure 7 shows the mission settings as discussed above.
 |
| Figure 7: Mission Settings |
Once the mission settings are set, click the OK button and review the flight plan. If there are areas of orange as shown in figure 8 The Bramor ppX is going to hit the terrain and, the mission altitude and flight path should be adjusted accordingly.
 |
| Figure 8: Possible Collision with Terrain Shown in Dark Orange |
Once the mission settings are complete, one must adjust the Takeoff Point, Rally Point and, Landing Point. The Takeoff Point is the location where the Bramor ppX will head to once it launches, starts it’s motor and begins climbing. Once at the Takeoff Point, it will loiter at that point until a further command is given. The Takeoff Point should be set to an area where it can safely ascend without encountering an obstacle on climbout.
Once loitering at the Takeoff Point, the Bramor ppX can be switched into Navigation mode and once selected, it will fly the waypoint mission loaded.
After the mission is complete, the Bramor can be set to return to the Rally Point when commanded to land, it descends in a spiraling pattern to it’s final approach altitude. Because the Rally Point is where the Bramor descends, it is essential that no obstacles are at any point along the rally circle or on the final approach course.
Finally, when one clicks the Land button, the Bramor will descend as stated above, will follow the Rally to Parachute line and will deploy it’s parachute. If one needs to adjust the landing point, one will move the Landing Point and the Parachute Point will be automatically adjusted to factor in wind. (Note: The purple area is the predicted landing area, factoring in the windspeed and direction.)
Once at the launch location, all the parameters above should be checked and the following steps should be done following the preflight checklist. These steps include: clearing the photo log by clicking on Photos then clicking on Clear Log, switching the camera to auto by clicking the Camera Switch and changing it to Auto Camera Switch, uploading the waypoints by clicking Upload Waypoints, and clicking Sensor Initialization.
Office Checklist:
Before going out to fly a mission, the packing checklist should be followed to avoid forgetting important items such as charging the batteries. These Items are all listed in the Bramor ppX manual however I will list them below for completeness.
- UAV Batteries Charged
- Gatec F110 Tablet Batteries Charged
- GCS Batteries Charged
- Parachute Folded (less than 24hrs before use)
- USB Key Formatted (optional)
- Sensor Memory Card Formatted
- Mission Made and Saved
- Weather Forecast Checked
- C³P Elevation and Navigation Basemap Prefetched
Packing Checklist:
- Airframe Box
- Wings Packed
- Winglets Packed
- Parachute(s) Packed
- Parachute Folding Tool Packed
- Gatec F110 Tablet Charger Packed
- Wing Joiners (wing spars) Packed
- Airframe with Sensor Installed Packed
- Sensor Memory Card Packed
- USB Key Packed
- Y-Connector Packed (Deans parallel power splitter)
- Airframe Hatch Packed
- Pitot Cover Installed
- Parachute Safety Pin Installed
- Parachute Hatch Packed
- Propellor and Spare Packed
- 2.5mm Hex Key Packed
- Ground Control Station Packed
- Electrical Tape packed
- Box Cutter Packed
- UAV Batteries Packed
- Sensor Lens Protectors Packed
- UAV Battery Charger and Cables Packed
- Gatec F110 Tablet Packed
- Checklist Packed
- Catapult Box
- Catapult Packed
- Spare Braking Rope Packed
Operations:
Because the Bramor ppX’s flight is so automated, attention to detail in mission planning, running through checklists and, crew resource management is essential. When operating the Bramor, C-Astral recommends having a crew of two to operate the Bramor ppX however for our lab, we use groups of three or four for extra situational awareness.
The roles for each member are clearly defined with one person as the main operator, another as the copilot, a third as the visual observer, and a fourth as the equipment manager. The pilot’s job is to double check and alter the mission as needed, the copilot’s job is to read the checklist, and the equipment manager and visual observer’s job is to perform the items and affirm that they are completed. For example: If the copilot says, “parachute safety pin removed”, the visual observer or equipment manager would remove the parachute safety pin and say, “removed”.
Once launched, the visual observer and equipment manager travel to predefined locations to aid in situational awareness on the platform, while the copilot keeps in communication with them and relays what they have to say with pilot.
Preflight Checks:
Before beginning to setup the Bramor ppX, assign roles to so that no one is confused about their job then, follow the checklist.
- Catapult Initial Setup
- Catapult Unfold
- Catapult Legs Extend
- Catapult Leg Safety Locks Secure
- Central Catapult Rail Safety Lock Secure
- Sled Release Safety Pin Installed Check
- Catapult on Level Ground Check
- Winch Rope Fully Loosened Check
- Grey Winch Rope State Inspect (inspect for damage, loose knots, fraying etc)
- Black Catapult Sled Braking Rope Inspect (inspect for damage, fraying, loose knots etc).
- Elastic Rubber Bands State Check (Stretch them out by hand inspecting them for cracks)
- Wind Direction Check (orient the catapult into the wind)
- Airframe Initial Setup Part 1
- Airframe Center Section on Catapult Sled Place
- Wingspars Inspect (Inspect for cracks, dents, and stiffness)
- Wingspars Inserted into Wings Check
- Airframe Gold SMA Antenna Connector Connected
- Wings Connected to Airframe Check
- Winglets Installed Check
- Wings and Winglets, Wings and Center Body Gaps Sealed with Electrical Tape Check
- Pitot Tube Clean Check (no dirt or particles obstructing the holes)
- Propellor Bolts and General Condition Check
- Sensor Cable Attached to Sensor and Airframe Check
- Parachute Hatch Remove
- UAV Batteries Place (it is a tight fit and the main power leads may have to be carefully maneuvered to the side to fit them)
- Battery Elastic wire retainer Connect
- UAV Batteries Connected to Y-Connector Check
- Y-Connector Connected to UAV Check
- ESC Sound Played
- Camera Settings Check
- USB Key Installed Check
- Hatch Secure
- Ground Control Station Setup
- Ground Control Station Antenna Connected Check
- Gatec F110 Tablet On
- Gatec F110 Tablet Battery Check
- Gatec F110 Tablet Sound On Check
- Gatec F110 Tablet Bluetooth On Check
- Ground Control Station On
- Ground Control Station Battery Check Voltage
- C³P Application Launched
- Mission Open/Created
- UAV Battery Voltage Check
- Communication Check
- Satellites more than 7
- Navigation Map Loaded
- Parachute Pop (release the parachute hatch so it can be packed)
- Airframe Secondary Setup Part 2
- Parachute Install (follow the guidance of the manual and training to the letter as this step is key in mission success)
- Parachute Hatch attached and Reset Check
- Parachute Safety Pin Remove
- Remove Airframe from Sled and Held
- Mode Changed to Manual Set
- Move Aircraft and Ensure Servos are Functioning Correctly Check
- Motor Test Check
- Mode Changed to Safe Set
- Lens Cover Clean Check
- Software Checks
- Sensor Initialize Set
- Waypoints Verified, Check
- Takeoff Point Params Check
- Landing Points and Params Check
- Auto Camera Switch Select
- Photo Log Cleared
- Mission Upload
- Catapult Secondary Setups
- Catapult Safety Pin Verify Installed
- Catapult Elastic Rubber Bands On Rollers Check (make sure there are no crossed bands over the rollers)
- Catapult Wind Direction Check
- Final Software Checks
- Failsafes Set Check
- Sensor Initialize Set
- Airspeed Around 0 m/s
- Clear Pitot Tube Remove One Side and Blow to Test Airpeed Reading)
- Reinstall Clear Pitot Tube
- Catapult Tertiary
- Wind Direction Checked
- Airframe Secure on Catapult
- Catapult Winched fully in Check (do not leave it in this position for more than 1 minute)
- Propellor Folded Check
- Getac F110 Tablet Final Checks
- Takeoff Mode Set
- UAV into Takeoff Mode Set
- Catapult Final
- Foot on Plate
- Launch Safety Pin Remove
- Catapult Release Pull
There is an inflight checklist and a postflight checklist which are relatively straightforward, so refer to the official checklist for those items.
Conclusions:
The Bramor is a highly capable, almost fully autonomous, system that because of its highly autonomous nature, requires copious amounts of preplanning and preparation in order to operate successfully. With the proper training, checklist management, crew resource management, and attention to detail in every step, each operation may be a success.